超车时刻:Java反射源码解析
在《一篇文章全面了解Java反射机制》中我们学习了Java反射的基本使用,这篇文章就带大家一起来看看核心源码。这可是与新手拉开差距的机会。
关于反射的类
关于反射的类是很多的,我们在基础篇中已经涉及到一部分比如:Filed、Method、Constructor。同时,还有一些我们没有看到的类,比如:AccessibleObject、ReflectionFactory、MethodAccessor等。
本篇文章我们重点介绍Method类的invoke方法的处理逻辑,这也是Java反射最核心的部分。
常见反射异常
我们在使用一些框架时经常会看到类似如下的异常:
at sun.reflect.NativeMethodAccessorImpl.invoke0(Native Method)
    at sun.reflect.NativeMethodAccessorImpl.invoke(Unknown Source)
    at sun.reflect.DelegatingMethodAccessorImpl.invoke(Unknown Source)
这类异常便是通过反射机制实现的方法,在执行Method的invoke方法时抛出的异常。
比如,在Spring的xml配置文件中配置了不存在的类时,异常堆栈便会将异常指向调用的invoke方法。
所以,当你遇到类似的异常,可以简单推断一下,你所使用的框架可能使用了反射机制。
下面,我们就来看看Method的invoke方法到底做了些什么。
源码分析
直接点击程序中调用的invoke方法,查看第一层源代码:
@CallerSensitive
public Object invoke(Object obj, Object... args)
    throws IllegalAccessException, IllegalArgumentException,
       InvocationTargetException{
    if (!override) {
        if (!Reflection.quickCheckMemberAccess(clazz, modifiers)) {
            Class<?> caller = Reflection.getCallerClass();
            checkAccess(caller, clazz, obj, modifiers);
        }
    }
    MethodAccessor ma = methodAccessor;             // read volatile
    if (ma == null) {
        ma = acquireMethodAccessor();
    }
    return ma.invoke(obj, args);
}
@CallerSensitive注解:这个注解是Java修复漏洞用的。防止使用者使用双重反射来提升权限,原理是因为当时反射只检查深度的调用者的类是否有权限,本身的类是没有这么高权限的,但是可以通过多重反射来提高调用的权限。
使用该注解,getCallerClass方法就会直接跳过有 @CallerSensitive修饰的接口方法,直接查找真实的调用者(actual caller)。
在invoke方法的前半部部分主要是用来做一些检查工作,重点在于ma.invoke(obj, args)方法。这里使用到了MethodAccessor接口,该接口位于sun.reflect包下,是生成反射类的入口,此部分属于未开源部分。
在MethodAccessor中定义了invoke方法:
public interface MethodAccessor {
    Object invoke(Object var1, Object[] var2) throws IllegalArgumentException, InvocationTargetException;
}
该接口默认有三个实现类:
sun.reflect.DelegatingMethodAccessorImpl
sun.reflect.MethodAccessorImpl
sun.reflect.NativeMethodAccessorImpl
默认情况下methodAccessor值是为null的,那么看看acquireMethodAccessor方法是如何创建MethodAccessor的实现类的。
private MethodAccessor acquireMethodAccessor() {
    // First check to see if one has been created yet, and take it
    // if so
    MethodAccessor tmp = null;
    if (root != null) tmp = root.getMethodAccessor();
    if (tmp != null) {
        methodAccessor = tmp;
    } else {
        // Otherwise fabricate one and propagate it up to the root
        tmp = reflectionFactory.newMethodAccessor(this);
        setMethodAccessor(tmp);
    }

    return tmp;
}
acquireMethodAccessor方法中首先判断是否存在MethodAccessor的实例,如果存在则直接拿来使用。否则,调用ReflectionFactory的newMethodAccessor方法来创建一个,创建完成并设置到root配置中。
继续看newMethodAccessor的创建过程:
public MethodAccessor newMethodAccessor(Method var1) {
    checkInitted();
    if (noInflation && !ReflectUtil.isVMAnonymousClass(var1.getDeclaringClass())) {
        return (new MethodAccessorGenerator()).generateMethod(var1.getDeclaringClass(), var1.getName(), var1.getParameterTypes(), var1.getReturnType(), var1.getExceptionTypes(), var1.getModifiers());
    } else {
        NativeMethodAccessorImpl var2 = new NativeMethodAccessorImpl(var1);
        DelegatingMethodAccessorImpl var3 = new DelegatingMethodAccessorImpl(var2);
        var2.setParent(var3);
        return var3;
    }
}
通过debug会发现,默认情况下首先进入else处理逻辑中。在else中创建了一个NativeMethodAccessorImpl对象,并作为构造参数传入了DelegatingMethodAccessorImpl的构造方法中。
这里很明显使用了代理模式(可参看《Java代理模式及动态代理详解》一文),将NativeMethodAccessorImpl对象交给 DelegatingMethodAccessorImpl对象代理。同时,通过setParent方法,NativeMethodAccessorImpl也持有了DelegatingMethodAccessorImpl的引用。
看你一下DelegatingMethodAccessorImpl的源码,你会发现它就是代理模式的标准实现:
class DelegatingMethodAccessorImpl extends MethodAccessorImpl {
    private MethodAccessorImpl delegate;

    DelegatingMethodAccessorImpl(MethodAccessorImpl var1) {
        this.setDelegate(var1);
    }

    public Object invoke(Object var1, Object[] var2) throws IllegalArgumentException, InvocationTargetException {
        return this.delegate.invoke(var1, var2);
    }

    void setDelegate(MethodAccessorImpl var1) {
        this.delegate = var1;
    }
}
NativeMethodAccessorImpl被赋值给DelegatingMethodAccessorImpl中的DelegatingMethodAccessorImpl属性,同时这两个类都实现了MethodAccessorImpl接口。而在DelegatingMethodAccessorImpl又包装了invoke方法。静态代理的标准实现方式。
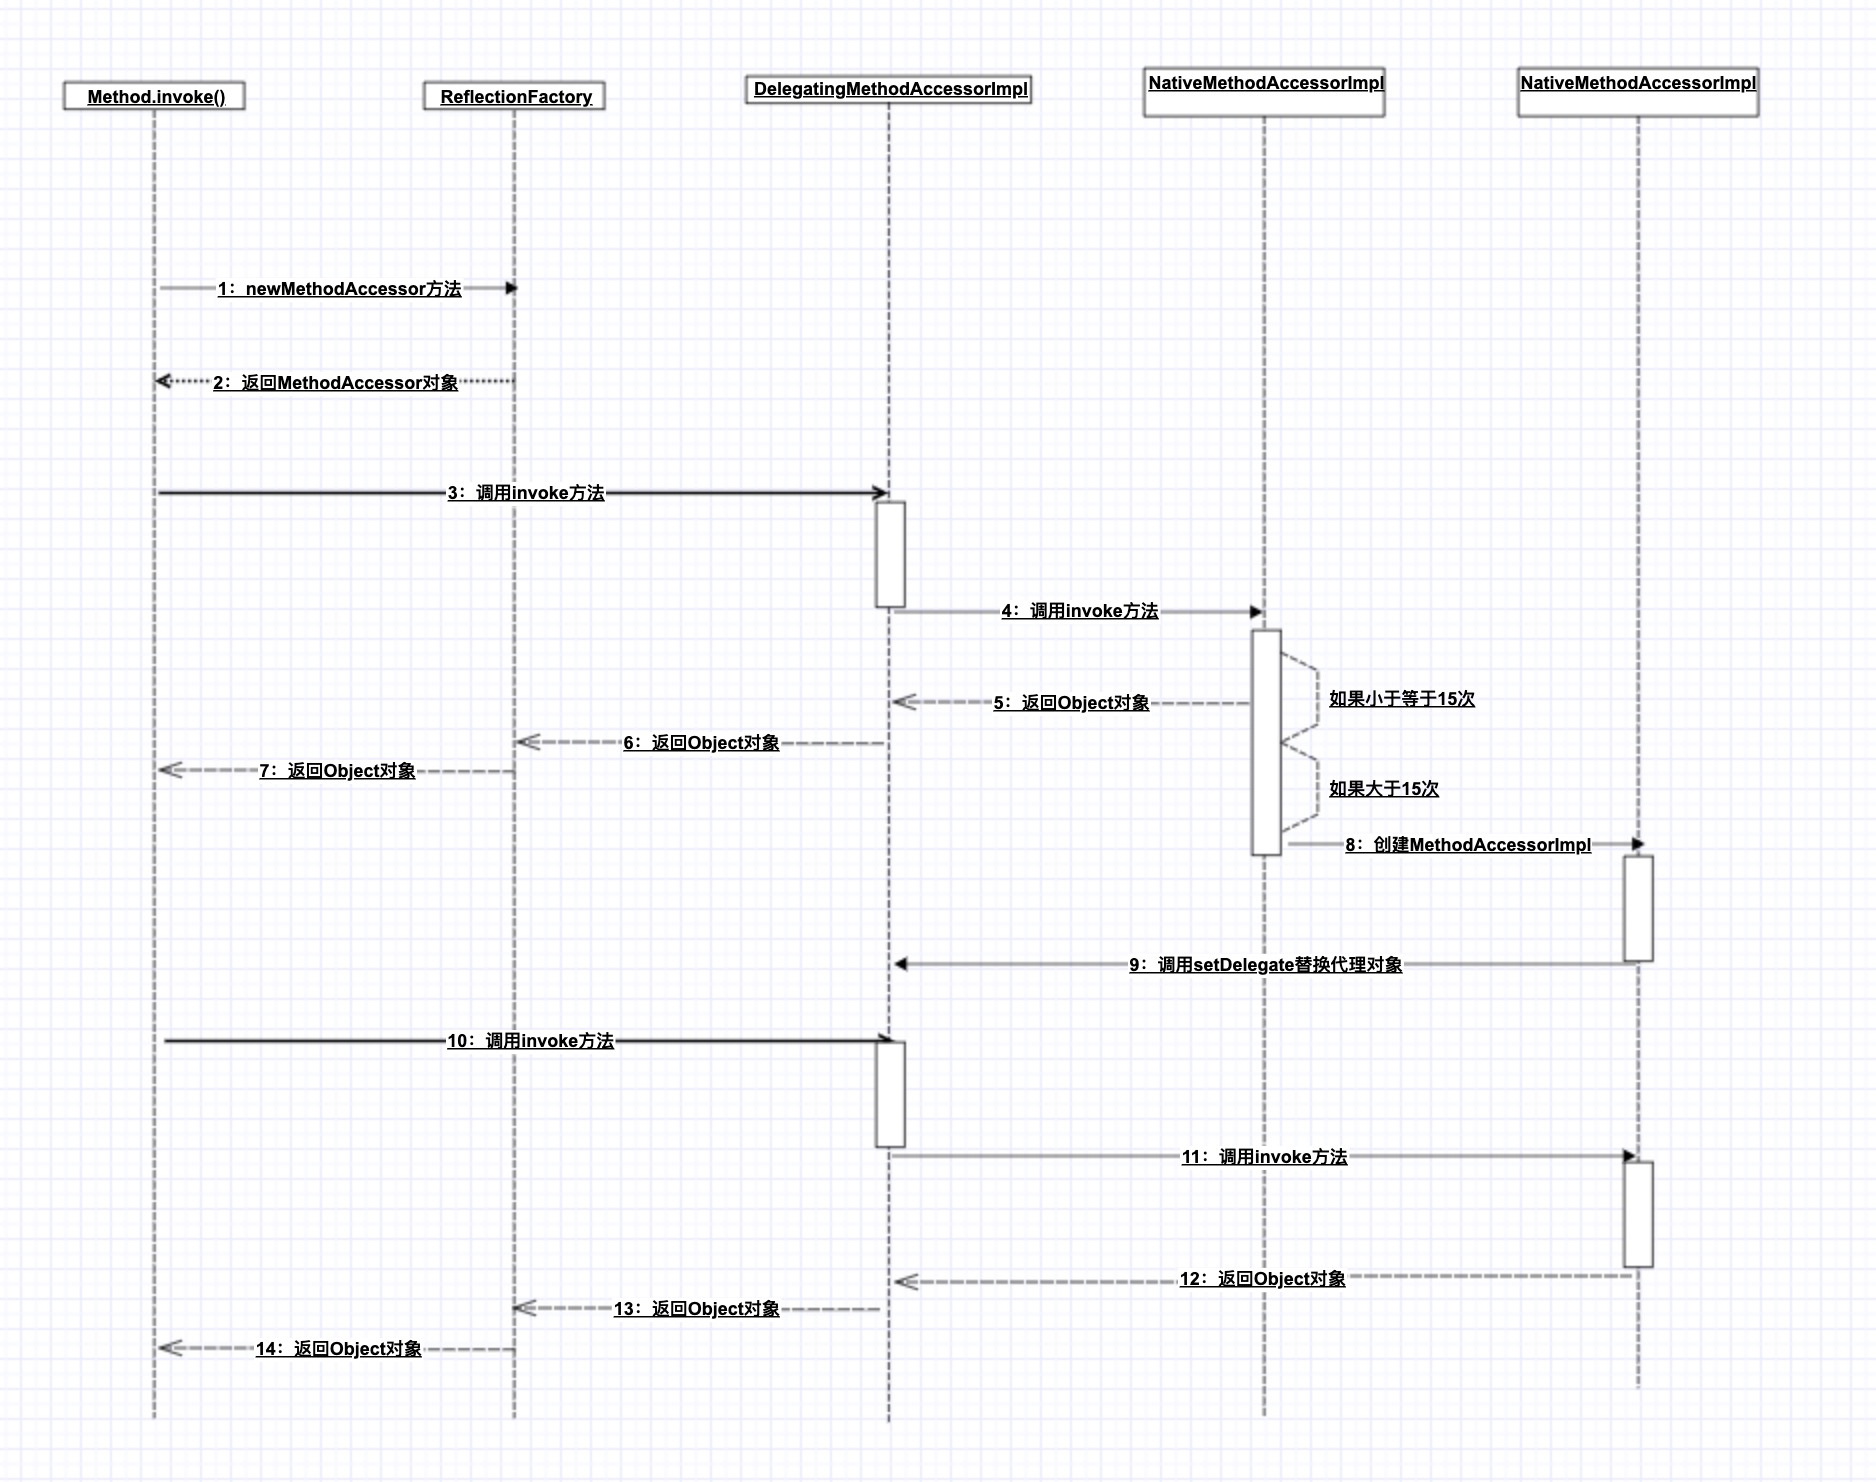
经过代码跟踪,我们发现ReflectionFactory类的newMethodAccessor方法返回的是DelegatingMethodAccessorImpl类对象。那么ma.invoke()方法调用的是DelegatingMethodAccessorImpl的invoke方法。
而DelegatingMethodAccessorImpl又调用了设置的NativeMethodAccessorImpl对象的invoke方法。
public Object invoke(Object var1, Object[] var2) throws IllegalArgumentException, InvocationTargetException {
    if (++this.numInvocations > ReflectionFactory.inflationThreshold() && !ReflectUtil.isVMAnonymousClass(this.method.getDeclaringClass())) {
        MethodAccessorImpl var3 = (MethodAccessorImpl)(new MethodAccessorGenerator()).generateMethod(this.method.getDeclaringClass(), this.method.getName(), this.method.getParameterTypes(), this.method.getReturnType(), this.method.getExceptionTypes(), this.method.getModifiers());
        this.parent.setDelegate(var3);
    }

    return invoke0(this.method, var1, var2);
}
该invoke方法中首先会判断numInvocations是否会大于一个阈值,改值默认为:
private static int inflationThreshold = 15;
如果大于该值并且不是匿名类则会进行新的MethodAccessorImpl的创建,并且赋值给代理类DelegatingMethodAccessorImpl。也就是说创建了一个新的实现类把上面原有的实现类给替换掉了。
在MethodAccessor的具体实现中使用了Inflation(通货膨胀)机制。初次加载字节码实现反射,使用Method.invoke()和Constructor.newInstance()加载花费的时间是使用原生代码加载花费时间的3到4倍。这使得那些频繁使用反射的应用需要花费更长的启动时间。
为了避免这种加载时间的问题,在第一次加载的时候重用了JVM的入口,之后切换到字节码实现的实现。
上面我们也看到了MethodAccessor实现中有一个Native版本和Java版本。
Native版本一开始启动快,但是随着运行时间变长,速度变慢。Java版本一开始加载慢,但是随着运行时间变长,速度变快。正是因为两种存在这些问题,所以第一次加载时使用的是NativeMethodAccessorImpl,而当反射调用次数超过15次之后,则使用MethodAccessorGenerator生成的MethodAccessorImpl对象去实现反射。
最后,我们看一下整个过程的时序图。


关注公众号:程序新视界,一个让你软实力、硬技术同步提升的平台
除非注明,否则均为程序新视界原创文章,转载必须以链接形式标明本文链接
本文链接:https://choupangxia.com/2020/03/28/java-reflect-invoke/