centos7 搭建ss(ssserver)服务器及shadowsocks客户端配置
简述
因为工作需要或网站建设等,需要进行ss(ssserver)的搭建及通过shadowsocks客户端配置进行连接。本篇文章带大家了解一下此过程。
centos7中ss服务器配置
通过ssh链接上服务器,依次执行以下命令。
sudo yum install python-setuptools

sudo easy_install pip

sudo pip install shadowsocks
因为shadowsocks服务器版本需要python支撑,因此需先安装paython环境。
当看到如下日志,说明安装成功。
[centos@ip-17 ~]$ sudo pip install shadowsocks
DEPRECATION: Python 2.7 will reach the end of its life on January 1st, 2020. Please upgrade your Python as Python 2.7 won't be maintained after that date. A future version of pip will drop support for Python 2.7. More details about Python 2 support in pip, can be found at https://pip.pypa.io/en/latest/development/release-process/#python-2-support
Collecting shadowsocks
  Downloading https://files.pythonhosted.org/packages/02/1e/e3a5135255d06813aca6631da31768d44f63692480af3a1621818008eb4a/shadowsocks-2.8.2.tar.gz
Installing collected packages: shadowsocks
  Running setup.py install for shadowsocks ... done
Successfully installed shadowsocks-2.8.2
shadowsocks服务器配置
在/etc文件下创建shadowsocks.json配置文件。即通过如下命令:
sudo vim /etc/shadowsocks.json
在其中写入如下配置:
{
  "server": "0.0.0.0",
  "local_address": "127.0.0.1",
  "local_port": 1080,
  "port_password": {
    "8888": "password"
  },
  "timeout": 600,
  "method": "aes-256-cfb"
}
其中参数解析如下:
- server 表示监听的地址,这里表示监听所有的地址;
- local_address:本地地址
- local_port:本地端口
- port_password:监听外部请求的端口和对应的密码;此处可以配置多个,以逗号分隔。
- timeout:超时时间600秒。
- method:通信加密方式。
启动或停止服务
启动命令:
sudo ssserver -c /etc/shadowsocks.json -d start
停止命令:
sudo ssserver -c /etc/shadowsocks.json -d stop
命令拓展,可通过执行ssserver获得更多的参数支持。
[centos@ip-172-31-36-133 ~]$ ssserver -help
option -e not recognized
usage: ssserver [OPTION]...
A fast tunnel proxy that helps you bypass firewalls.

You can supply configurations via either config file or command line arguments.

Proxy options:
  -c CONFIG              path to config file
  -s SERVER_ADDR         server address, default: 0.0.0.0
  -p SERVER_PORT         server port, default: 8388
  -k PASSWORD            password
  -m METHOD              encryption method, default: aes-256-cfb
  -t TIMEOUT             timeout in seconds, default: 300
  --fast-open            use TCP_FASTOPEN, requires Linux 3.7+
  --workers WORKERS      number of workers, available on Unix/Linux
  --forbidden-ip IPLIST  comma seperated IP list forbidden to connect
  --manager-address ADDR optional server manager UDP address, see wiki

General options:
  -h, --help             show this help message and exit
  -d start/stop/restart  daemon mode
  --pid-file PID_FILE    pid file for daemon mode
  --log-file LOG_FILE    log file for daemon mode
  --user USER            username to run as
  -v, -vv                verbose mode
  -q, -qq                quiet mode, only show warnings/errors
  --version              show version information

Online help: <https://github.com/shadowsocks/shadowsocks>
客户端配置
shadowsocks客户端下载地址:https://github.com/shadowsocks/ShadowsocksX-NG/releases
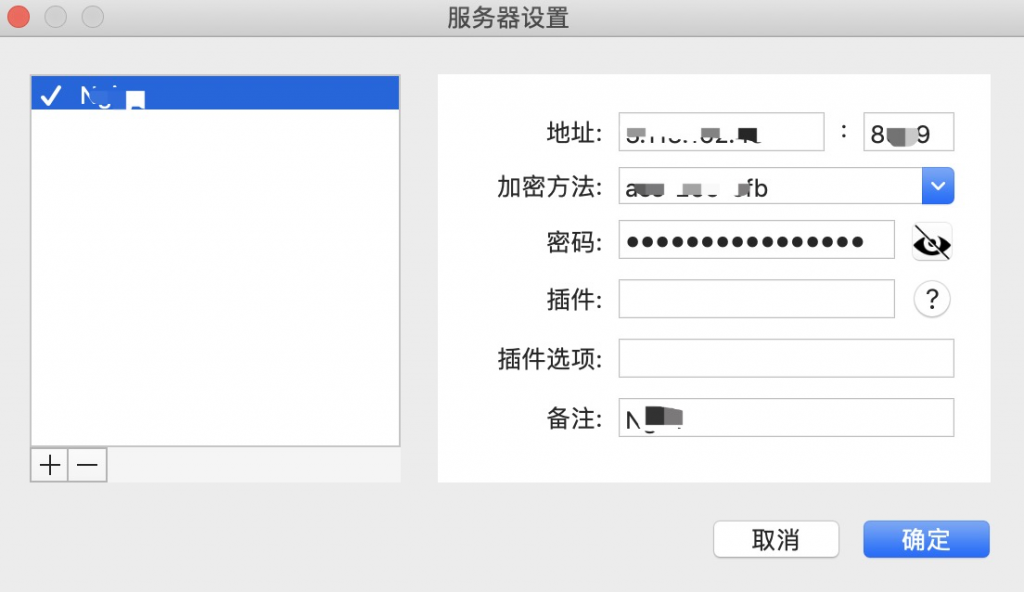
下载对应的版本安装,然后依次选择服务器–服务器设置,然后新增一个配置,相关参数就是我们上面json文件中配置的参数。以下为mac下的配置

本文来源:https://www.choupangxia.com

关注公众号:程序新视界,一个让你软实力、硬技术同步提升的平台
除非注明,否则均为程序新视界原创文章,转载必须以链接形式标明本文链接